Monday, March 7, 2016

Interested Transaction Lists (ITL) Waits

What are ITLs

Ever wondered how Oracle locks rows on behalf of transactions? In some RDBMS vendor implementations, The manager maintains information on which row is locked by which transaction. This works great in theory but when pretty soon the lock manager becomes a bottleneck as each transaction must wait to get a lock from the manager and then again wait to release the lock. This of course goes against the scalability of the applications. In fact, application developers of some RDBMS products despise holding locks for a long time, and often times resorting to a full table lock when all its needed is to get a few rows locked. This creates further waits and scalability suffers.
So how is that different in Oracle? For starters there is no lock manager. When a row is locked by a transaction, that information is placed in the block header where the row is located. When another transaction wishes to acquire the lock on the same row, it has to travel to the block containing the row anyway, and upon reaching there, it can easily identify that the row is locked, from the block header. There is no need to queue up for some single resource like a lock manager. This makes applications immensely scalable.
So what portion of the block header contains information on locking? It is a simple data structure called Interested Transaction List (ITL), a linked list data structure that maintains information on transaction address and rowid. ITL contains several slots for transactions. When a row in the block is locked for the first time, the transaction places a lock in one of the slots with the rowid of the row that is has locked. In other words, the Transactions is Interested in the row, hence the name Interested Transaction List. When the same transaction or another one locks another row, the information is stored in another slot and so on and so forth. 
So how many slots are available? During the table creation, the parameter INITRANS parameter defines how many slots are initially created in the ITL. When the transactions exhaust all the available slots and a new transaction comes in to lock a row, the ITL grows to create another slot. But to what extent can it grow? It can grow up to the number defined by the MAXTRANS parameter of the table, provided there is space in the block.

What is an ITL Wait

If a block is so packed that the the ITL cannot grow to create a free slot, then the transaction that needs to lock a row waits, till a slot becomes available. This wait is termed as ITL waits and can be seen when from v$session_wait is the session is waiting. Let's see these description in action. Assume our table has  INITRANS of 1 and MAXTRANS 11. A typical data block right after the creation of the table will look like this.

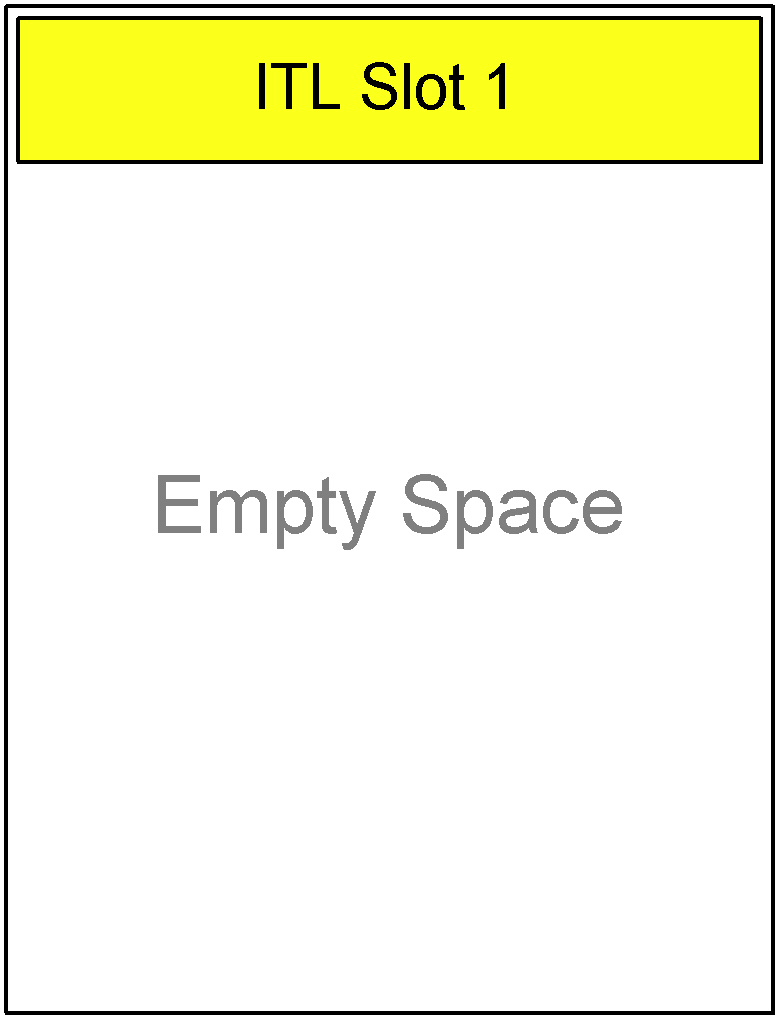
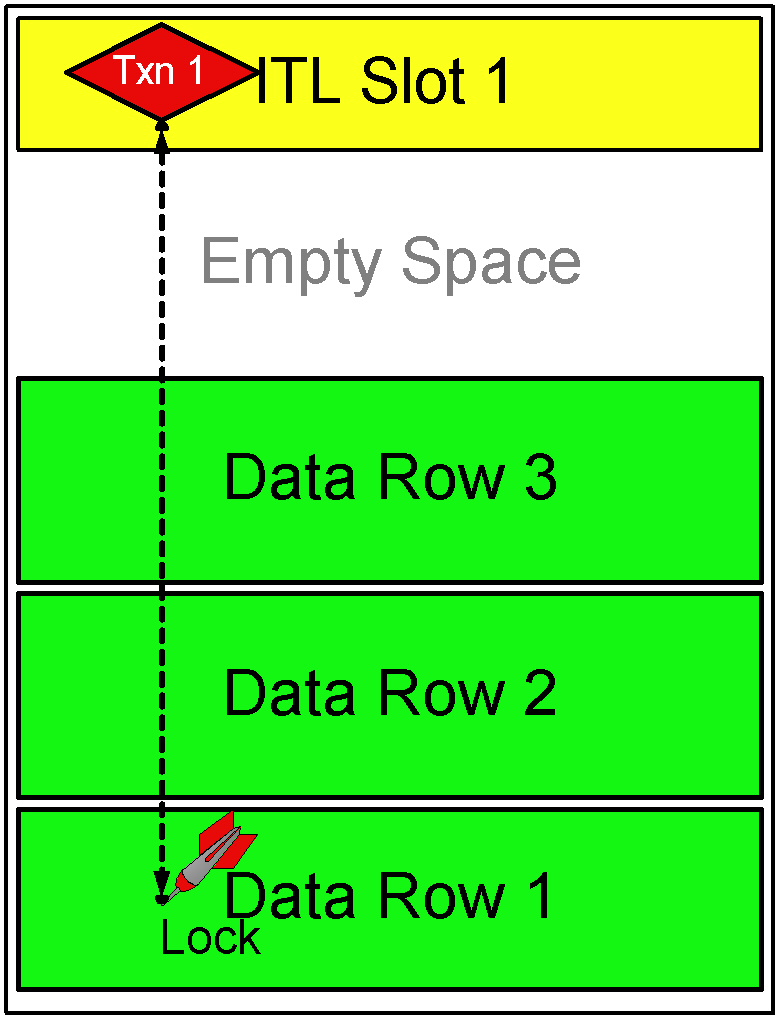
Since the INITRANS is 1, there is only one slot for the ITL. The rest of the block is empty. Now we inserted two rows into the table. These will go into this block and the block will look like the following.

Note how the empty space is reduced. A this point a transaction, Txn1 updates the row 1, and does not commit. This locks the Data Row 1; and the transaction places the lock in the slot in the ITL as follows.

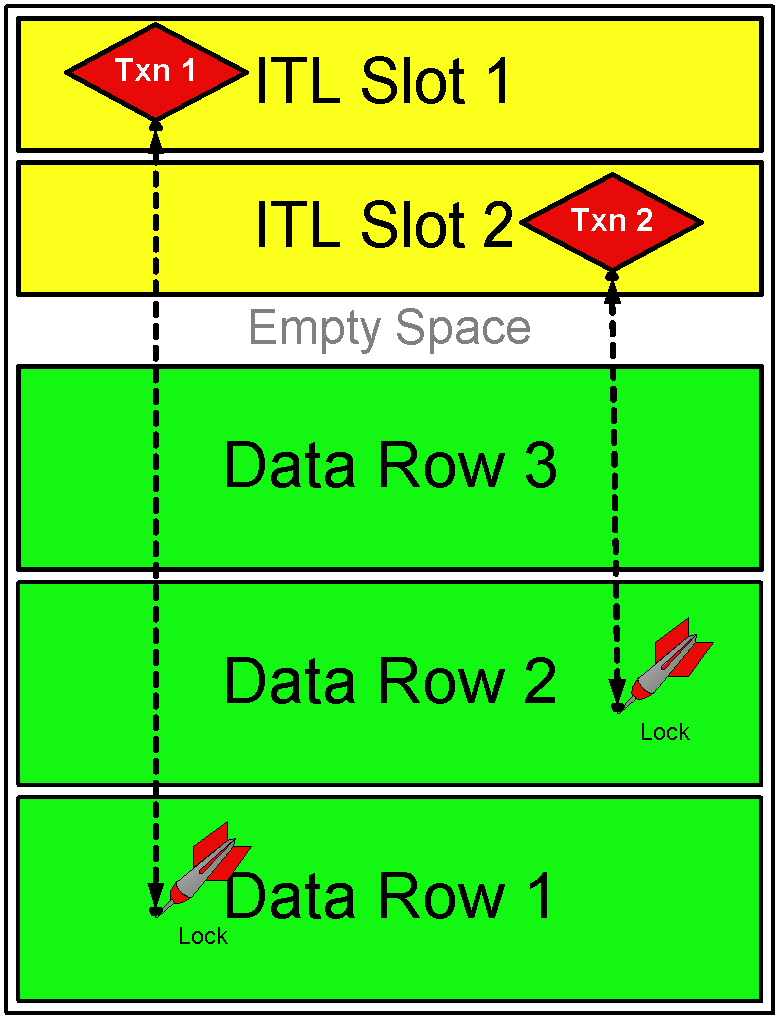
Then another transaction Txn2 updates the row 2 and wants to lock the row. However there are no more slots in the ITL available to service the transaction. The MAXTRANS entry is 11 meaning the ITL can grow up to 11 slots; and the block has empty space. So ITL can grow by another slot and Slot # 2 is created and allocated to Txn2 as in the following diagram.

Now the emplty space in the block is severely limited, and it will not be able to fit one ITL slot. If at this time another transaction comes in to update the row 3, it has to have a free slot in the ITL. The MAXTRANS is 11 and currently only two slots have been created, so another one is possible; but since there is no room in the block to grow, the slot can't be created. Therefore the Txn3 has to wait till either of the other transactions rolls back or commits and the slot held by it becomes free. At this time the session will experience ITL waits wait event as seen from the view V$SESSION_WAIT. 

How to Reduce ITL Waits

The primary cause of ITL waits is the unavailability of free slots in the ITL. These can be due to 
  • low setting of the MAXTRANS, which places a hard limit on the number of transactions that can have locks on a block
  • or, the block is so packed that there is no room for the ITL to grow OR
  • or both
Therefore, setting a high value of INITRANS will make sure that there are enough free slots in the ITL and there will be minimal or no dynamic extension of the ITL. However this also means that there is less space in the block for actual data, increasing wasted space.
The other option is to making sure the data is less packed so that ITL can grow enough to accommodate the surges in ITL. This can be done by increasing PCTFREE, increasing FREELISTS and FREELIST GROUPS parameters for a table. This will make a block hold less data and more room for the ITL to grow. As a direct result of the reduction in packing, the table will experience less buffer busy waits event, increasing performance.

What INITRANS is Optimal?

Now that you have set up the INITRANS for a segment, how do you make sure that the setting is correct. The best answer will be found in Oracle 9i Release 2 provided Segment Level Statistics. However, that is only available in 9iR2. In other versions it's slightly tricky. You have to rely on V$LOCK where lock_type = 'TX' and share_type = 4 to find out the possible ITL wait scenarios; but it is never accurately predicted.
On the other side of the coin, how do you know if the INITRANS setting is too high and just being wasted? This is possible by using a few random block dumps from the segment in question. First, find out the header file# and header block# of the segment by issuing the query:
SELECT HEADER_FILE, HEADER_BLOCK
FROM DBA_SEGMENTS
WHERE OWNER = '...'
AND SEGMENT_NAME = '...';
Use the output of the query to do a block dump of the header block.
ALTER SYSTEM DUMP DATAFILE <file#> BLOCK MIN <block#> BLOCK MAX <block#>;
This will produce a trace file in the USER_DUMP_DESTINATION directory. Open the trace file and find out the section on extent control as follows.
Extent Control Header
-----------------------------------------------------------------
Extent Header:: spare1: 0 spare2: 0 #extents: 1 #blocks: 10
last map 0x00000000 #maps: 0 offset: 2080
Highwater:: 0x02011f87 ext#: 0 blk#: 0 ext size: 10
#blocks in seg. hdr's freelists: 0
#blocks below: 0
mapblk 0x00000000 offset: 0
Unlocked
Map Header:: next 0x00000000 #extents: 1 obj#: 53689 flag: 0x40000000
Extent Map
-----------------------------------------------------------------
0x02011f87 length: 10 

Find out the real number of blocks for the segment from dba_segments as follows
SELECT BLOCKS FROM DBA_SEGMENTS WHERE OWNER = '...' AND SEGMENT_NAME = '...';
Say, this returns 12 and the #blocks above shows 10; it means the first 2 blocks are header block the data starts at 3rd block onwards. Take a dump of the third block. The third block is obtained by adding 2 to the header block# obtained above.
ALTER SYSTEM DUMP DATAFILE <file#> BLOCK MIN <block#> BLOCK MAX <block#>;
This will produce another trace file in USER_DUMP_DEST directory. Open the file and locate the follwoing section.
buffer tsn: 8 rdba: 0x02011f88 (8/73608)
scn: 0x0000.389b8d81 seq: 0x01 flg: 0x04 tail: 0x8d810601
frmt: 0x02 chkval: 0x2ef5 type: 0x06=trans data
Block header dump: 0x02011f88
Object id on Block? Y
seg/obj: 0xd1ad csc: 0x00.389b8d81 itc: 4 flg: - typ: 1 - DATA
fsl: 0 fnx: 0x0 ver: 0x01

Itl  Xid                 Uba                Flag Lck Scn/Fsc
0x01 0x0003.003.000024cc 0x00804067.050a.13 C-U- 0 scn 0x0000.389b304e
0x02 0x0007.010.00002763 0x00801f49.0453.01 C--- 0 scn 0x0000.389b2628
0x03 0x0002.00a.000025d5 0x00804d42.04b2.25 C--- 0 scn 0x0000.389b2811
0x04 0x0006.006.00002515 0x00800962.03c8.18 C-U- 0 scn 0x0000.389b3044

This shows several information on the block dump, especially the ITL section just above. This table has an INITRANS entry of 4, so there are 4 lines, one each per the ITL. In the Flag column above the flag -U- mans the ITL was used. In this case only two of the ITLs were used. The other two were never used. However, this is for this block only. By selecting block dumps from other randomly selected blocks you could have an idea how many ITLs are actually used. Then you may decide to reduce the INITRANS.

Automatic Block Management in Oracle9i

In Oracle9i, this is somewhat changed due to the introduction of the Automatic Block Management (ABM) feature. This is specified at the tablespace level in the storage parameter as SEGMENT SPACE MANAGEMENT AUTO. For instance, the tablespace TS1 can be created as
CREATE TABESPACE TS1 
DATAFILE '...'
EXTENT MANAGEMENT LOCAL
SEGMENT SPACE MANAGEMENT AUTO;
The last line does the magic. In the ABM mode, Oracle maintains a bitmap for each segment with the information on the block. A bitmap is a data structure with a bit representing each bock. When a block becomes available for insert, the information is made available simply by setting the corresponding bit in the bitmap rather than freelists. So what des this have to do with ITL Waits. Unfortunately, the very cause of ITL waits is not due to the freespace management, rather due to the unavailability of it. So you still have to look for ITL Waits and correct them using INITRANS and MAXTRANS. In fact the problem becomes exacerbated due to the fact the block becomes quite packed due to an efficient space management system and that leads to lack of space for ITL. You can prevent this by keeping a large INITRANS for the segment.

Friday, December 11, 2015

Oracle HASH Joins

HASH joins are the usual choice of the Oracle optimizer when the memory is set up to accommodate them. In a HASH join, Oracle accesses one table (usually the smaller of the joined results) and builds a hash table on the join key in memory. It then scans the other table in the join (usually the larger one) and probes the hash table for matches to it. Oracle uses a HASH join efficiently only if the parameter PGA_AGGREGATE_TARGET is set to a large enough value. If MEMORY_TARGET is used, the PGA_AGGREGATE_TARGET is included in the MEMORY_TARGET, but you may still want to set a minimum.

If you set the SGA_TARGET, you must set the PGA_AGGREGATE_TARGET as the SGA_TARGET does not include the PGA (unless you use MEMORY_TARGET as just described). The HASH join is similar to a NESTED LOOPS join in the sense that there is a nested loop that occurs—Oracle first builds a hash table to facilitate the operation and then loops through the hash table. When using an ORDERED hint, the first table in the FROM clause is the table used to build the hash table.
HASH joins can be effective when the lack of a useful index renders NESTED LOOPS joins inefficient. The HASH join might be faster than a SORT-MERGE join, in this case, because only one row source needs to be sorted, and it could possibly be faster than a NESTED LOOPS join because probing a hash table in memory can be faster than traversing a b-tree index.
As with SORT-MERGE joins and CLUSTER joins, HASH joins work only on equijoins. As with SORT-MERGE joins, HASH joins use memory resources and can drive up I/O in the temporary tablespace if the sort memory is not sufficient (which can cause this join method to be extremely slow).
Finally, HASH joins are available only when cost-based optimization is used (which should be 100 percent of the time for your application running on Oracle 11g).
Table 1 illustrates the method of executing the query shown in the listing that follows when a HASH join is used.

0468_001
Table 1. HASH join

0469_001

Tuesday, November 17, 2015

Configure EMC Storage Plugin for OEM12c

You will have to download the EMC Storage pluging and get it installed in your OEM.
This is a one time activity. Once it is done you can proceed as below for Adding the Target VNX Array to your Grid Monitoring.


1. From the Setup menu, select Add Target > Add Targets Manually.
2. In the Add Targets Manually page, select Add Non-Host Targets by Specifying Target
Monitoring Properties.
3. In the Target Type field, select EMC VNX Block Storage


4. To the right of the Monitoring Agent field, click the magnifying glass icon, and then
select the required agent or agents from the list.


5. Clilck Add Manually.

6. In the Add EMC Symmetrix VMAX page, enter the required properties for the target.
• Enter any string for the Target Name, which is used to identify the target being
created.
• Type Yes to accept the End User License Agreement that is packaged with the
plug-in.
• Enter the path to the directory where the inq utility is located (typically, /opt). Use
quotation marks if the path (such as on Windows) contains spaces. The inq utility
is included in the plug-in download package.
• If you use PowerBroker, enter the PB role that has privileges to run the command
listed earlier.
• Type 0 for normal logging. EMC Support may ask you to change this value to 1 to
help troubleshoot any issues you may have.
• Enter the path to the Solutions Enabler bin directory. Be sure to use double
quotation marks around this path if it contains spaces.
• Enter the EMC Array ID, which uniquely identifies the VNX storage system.


7. Click on Test Connection.


8. click OK and your target will be saved. You can repeat the same for all the arrays in your configuration.

Monday, November 16, 2015

Configure RAC cluster in OEM

Here are the step by step instructions to add a RAC database to 12c Grid. There is a catch in adding Clustered Databases is, when you try to discover (and add) a cluster databases like you do a standalone database, 
12c Grid does not show you an error but the process doesn’t complete. It is because of a missing a required step.
 Lets Start.
Deploy agents on all the nodes.
After all the  agents are deployed  to all nodes, we will add “Oracle Cluster and High Availability Service”.

Select Add Targets --> Add Targets manually


select “Add Targets Using Guided Process” and select  “Oracle Cluster and High Availability Service”.

Select one of the nodes which is part of the your cluster.No need to select all hosts.

Click on Discover Target

If you get an error - "No Cluster Was Found On The Host"

Workaround I: Execute the following commands on all cluster nodes, then try to discover the CRS target from EM console
  1. <AGENT_HOME>/agent_inst/bin/emctl stop agent
  2. export CRS_HOME=<CRS_HOME>
  3. <AGENT_HOME>/agent_inst/bin/emctl start agent
Workaround II: Discovery the cluster target manually by specifying target properties
  1. Setup/add targets/add targets manually
  2. Add Targets Declaratively by Specifying Target Monitoring Properties
  3. Target Type:Cluster
  4. Monitoring Agent: Choose one of the nodes of the cluster
  5. Click on "add manually"
  6. Enter the following details:-

        Target Name: <enter the name of the cluster target*>
        Oracle Home: <oracle home of the cluster*>
        Scan Name: <enter scan name*>
        Scan Port: <enter scan port*>
        ONS Port: <enter ONS port*>
  7. In the section "Cluster Host and High Availability Services Targets" the node which was chosen will be shown.  Click on "add" and choose the other nodes of the cluster.
  8. Click on save


It’ll discover the other nodes, and show you the findings so you may edit them if required. Click “Next”, review and then save the cluster.

 Now we have the cluster information, so we can add our clustered (RAC) database.
Go to “Add Targets Manually” page again, select “Add Targets Using Guided Process” and select  “Oracle Database, Listener and Automatic Storage Manager”.

Now you need to select “cluster” which was set up earlier. Click “Next”.

It will discover database, instances and ASM. Then you need to select the checkboxes of the discovered targets, enter the reqd passwords and  click “Next”. 

You’ll be able to review the result and add the database to EM12c by clicking “Save”. So we successfully added our RAC Databases(s) to EM12c.


How to Configure EMC VNX storage Plugin - Configure EMC Plugin for OEM

Tuesday, September 15, 2015

Archive log sync on Standby Database.

Situation
Your company’s primary database writes archive logs to a physical standby database using Oracle Dataguard and they are then applied. A nightly RMAN backup is performed and then all applied archive logs are purged from the archive log directory.

Problem

The RMAN backup is failing because flash_back_recovery area is full and the RMAN job is not purging the archive logs because they still have not been applied to the standby database.  Upon investigation you find that someone has brought the standby database online and opened it.  Due to this the standby will not apply the archive logs that have been shipped to it.  You have tried shutting down the standby database and bringing it up in a mounted state and starting managed recovery.  However, some of the archive logs to apply to standby are missing.

Solution

This scenario could have disastrous consequences if it is not taken care of immediately.  There is a simple solution to resolve this problem however; it can be a little scary to a less experienced Oracle DBA.  What needs to happen to remedy the problem is to re-sync the standby database with the primary database and get the archive logs to begin applying to the standby.  The simple solution to remedy this issue is described below.

Tips

Connect to the primary database and perform a full RMAN backup including the archive logs and the control files.  Since the flash_back_recovery area is full you will need to pass in a different directory to write to.  Here is an example of the RMAN backup script.
Set the Oracle environment to the production database and start RMAN:

$ rman
connect target /
run{
change archivelog all crosscheck;
allocate channel ch1 type disk;
backup incremental level 0 database format
'C:\oracle\orabase\backupfile\bk_inc0_%s_%p' setsize=8250000 include current
controlfile for standby ;
sql "alter system archive log current";
backup archivelog all format 'Your Location\al_%s_%p';
release channel ch1;
}

Once this is complete, copy the files from the location of your backup to the same location on the standby server.  Once the files are copied you will need to connect to the standby database and start RMAN to re-create standby.  Below is an example of the script that you will need to use modifying it to fit your environment.


$ rman
connect primary sys/password@primary
connect auxiliary /
run {
allocate auxiliary channel ch1 type disk;
duplicate target database for standby dorecover nofilenamecheck;
release channel ch1;
}

The restore of the standby database is now complete.  RMAN has started the standby database in mount standby
mode which is correct for us to continue. For reference the commands to start a standby database are:
SQL> startup nomount
SQL> alter database mount standby database;

Once the database is mounted connect to the standby database and put it in managed recovery mode so the archive logs from primary will apply automatically after they have been shipped over.

The command to do this is:
ALTER DATABASE RECOVER MANAGED STANDBY DATABASE DISCONNECT FROM SESSION;

Once you have issued this command give the process a few minutes and then check to see if the archive logs are being shipped and applied to standby.  An easy way to tell is to query the V$ARCHIVE_DEST_STATUS.

The command to do this is:
SELECT ARCHIVED_THREAD#, ARCHIVED_SEQ#, APPLIED_THREAD#,
APPLIED_SEQ# FROM V$ARCHIVE_DEST_STATUS;

Which will give you a result similar to the below example:

ARCHIVED_THREAD# ARCHIVED_SEQ# APPLIED_THREAD# APPLIED_SEQ#
---------------- ------------- --------------- ------------
1         14596               0            0
1         14596               0            0
1         14595               1        14595
0             0               0            0
0             0               0            0
0             0               0            0
0             0               0            0
0             0               0            0
0             0               0            0
0             0               0            0

10 rows selected.

As we can see from the query in this example the current applied archive log on primary is 14596 and the applied archive log on standby is 14595.

Once the logs are correctly applying from primary to standby go into RMAN on the primary database server and clean up the applied archive logs and run another full backup.  Once that is complete Oracle will free up the flash_back_recovery area and all RMAN errors will have been resolved and you now have a syncing standby database and good backups in case of an outage or disaster.

Manual steps to upgrade database from 9i to 10g

Step 1:

Log in to the system as the owner of the new 10gR2 ORACLE_HOME and copy the following files from the 10gR2 ORACLE_HOME/rdbms/admin directory to a directory outside of the Oracle home, such as the /tmp directory on your system:

ORACLE_HOME/rdbms/admin/utlu102i.sql
Make a note of the new location of these files
Step 2:

Change to the temporary directory that you copied files to in Step 1.

Start SQL*Plus and connect to the 9i database instance as a user with SYSDBA privileges. Then run and spool the utlu102i.sql file. 
sqlplus '/as sysdba'

SQL> spool Database_Info.log
SQL> @utlu102i.sql
SQL> spool off 
Then, check the spool file and examine the output of the upgrade information tool. The sections which follow, describe the output of the Upgrade Information Tool (utlu102i.sql).
Database:

This section displays global database information about the current database such as the database name, release number, and compatibility level. A warning is displayed if the COMPATIBLE initialization parameter needs to be adjusted before the database is upgraded. 

Logfiles:

This section displays a list of redo log files in the current database whose size is less than 4 MB. For each log file, the file name, group number, and recommended size is displayed. New files of at least 4 MB (preferably 10 MB) need to be created in the current database. Any redo log files less than 4 MB must be dropped before the database is upgraded.

Tablespaces:

This section displays a list of tablespaces in the current database. For each tablespace, the tablespace name and minimum required size is displayed. In addition, a message is displayed if the tablespace is adequate for the upgrade. If the tablespace does not have enough free space, then space must be added to the tablespace in the current database. Tablespace adjustments need to be made before the database is upgraded.

Update Parameters: 

This section displays a list of initialization parameters in the parameter file of the current database that must be adjusted before the database is upgraded. The adjustments need to be made to the parameter file after it is copied to the new Oracle Database 10g release.

Deprecated Parameters: 

This section displays a list of initialization parameters in the parameter file of the current database that are deprecated in the new Oracle Database 10g release. 

Obsolete Parameters:

This section displays a list of initialization parameters in the parameter file of the current database that are obsolete in the new Oracle Database 10g release. Obsolete initialization parameters need to be removed from the parameter file before the database is upgraded.

Components:

This section displays a list of database components in the new Oracle Database 10g release that will be upgraded or installed when the current database is upgraded.

Miscellaneous Warnings:

This section provides warnings about specific situations that may require attention before and/or after the upgrade.

SYSAUX Tablespace: 

This section displays the minimum required size for the SYSAUX tablespace, which is required in Oracle Database 10g. The SYSAUX tablespace must be created after the new Oracle Database 10g release is started and BEFORE the upgrade scripts are invoked. 

Step 3:

Check for the deprecated CONNECT Role 

After upgrading to 10gR2, the CONNECT role will only have the CREATE SESSION privilege; the other privileges granted to the CONNECT role in earlier releases will be revoked during the upgrade. To identify which users and roles in your database are granted the CONNECT role, use the following query:
SELECT grantee FROM dba_role_privs
WHERE granted_role = 'CONNECT' and
grantee NOT IN (
'SYS', 'OUTLN', 'SYSTEM', 'CTXSYS', 'DBSNMP',
'LOGSTDBY_ADMINISTRATOR', 'ORDSYS', 
'ORDPLUGINS', 'OEM_MONITOR', 'WKSYS', 'WKPROXY',
'WK_TEST', 'WKUSER', 'MDSYS', 'LBACSYS', 'DMSYS',
'WMSYS', 'OLAPDBA', 'OLAPSVR', 'OLAP_USER', 
'OLAPSYS', 'EXFSYS', 'SYSMAN', 'MDDATA',
'SI_INFORMTN_SCHEMA', 'XDB', 'ODM');

If users or roles require privileges other than CREATE SESSION, then grant the specific required privileges prior to upgrading. The upgrade scripts adjust the privileges for the Oracle-supplied users.

In Oracle 9.2.x and 10.1.x CONNECT role includes the following privileges:

SELECT GRANTEE,PRIVILEGE FROM DBA_SYS_PRIVS
WHERE GRANTEE='CONNECT'

GRANTEE PRIVILEGE 
------------------------------ ---------------------------
CONNECT CREATE VIEW
CONNECT CREATE TABLE
CONNECT ALTER SESSION
CONNECT CREATE CLUSTER
CONNECT CREATE SESSION
CONNECT CREATE SYNONYM
CONNECT CREATE SEQUENCE
CONNECT CREATE DATABASE LINK

In Oracle 10.2 the CONNECT role only includes CREATE SESSION privilege.

Step 4:

Check for invalid objects in the database:
spool invalid_pre.lst
select substr(owner,1,12) owner,
substr(object_name,1,30) object,
substr(object_type,1,30) type, status from
dba_objects where status <> 'VALID';
spool off 

Run the following script as a user with SYSDBA privs using SQL*Plus and then requery invalid objects: 

% sqlplus '/as sysdba'
SQL> @?/rdbms/admin/utlrp.sql

This last query will return a list of all objects that cannot be recompiled before the upgrade in the file 'invalid_pre.lst'
If you are upgrading from Oracle9iR2 (9.2), verify that the view dba_registry contains data. If the view is empty, run the following scripts from the 9.2 home:
% sqlplus '/as sysdba' 
SQL> @?/rdbms/admin/catalog.sql 
SQL> @?/rdbms/admin/catproc.sql 
SQL> @?/rdbms/admin/utlrp.sql 
and verify that the dba_registry view now contains data. 
Step 5:

Stop the listener for the database:
$ lsnrctl 
LSNRCTL> stop 

Ensure no files need media recovery: 

$ sqlplus '/ as sysdba' 
SQL> select * from v$recover_file; 

This should return no rows. 
Step 6:

Ensure no files are in backup mode: 

SQL> select * from v$backup where status!='NOT ACTIVE'; 

This should return no rows.
Step 7:

Resolve any outstanding unresolved distributed transaction: 

SQL> select * from dba_2pc_pending; 

If this returns rows you should do the following: 

SQL> select local_tran_id from dba_2pc_pending;
SQL> execute dbms_transaction.purge_lost_db_entry(''); 
SQL> commit;

Step 8:

Disable all batch and cron jobs. 
Step 9:

Ensure the users sys and system have 'system' as their default tablespace. 

SQL> select username, default_tablespace from dba_users 
where username in ('SYS','SYSTEM'); 

To modify use:

SQL> alter user sys default tablespace SYSTEM; 
SQL> alter user system default tablespace SYSTEM; 

Step 10:

Ensure that the aud$ is in the system tablespace when auditing is enabled.

SQL> select tablespace_name from dba_tables where table_name='AUD$';

Step 11:

Note down where all control files are located.

SQL> select * from v$controlfile;
Step 12:

Shutdown the database 

$ sqlplus '/as sysdba' 
SQL> shutdown immediate; 

Step 13:
Perform a full cold backup

Upgrading to the New Oracle Database 10g Release 2

Step 14:

Update the init.ora file: 

- Make a backup of the old init.ora file
On Unix/Linux, the default location of the file is the $ORACLE_HOME/dbs directory

- Comment out any obsoleted parameters. 

- Change all deprecated parameters. 
Step 15:
Copy configuration files from the ORACLE_HOME of the database being upgraded 
to the new Oracle Database 10g ORACLE_HOME:

If your parameter file resides within the old environment's ORACLE_HOME, 
then copy it to the new ORACLE_HOME. By default, Oracle looks for the parameter
file in ORACLE_HOME/dbs on UNIX platforms and in ORACLE_HOME\database on 
Windows operating systems. The parameter file can reside anywhere you wish,
but it should not reside in the old environment's ORACLE_HOME after you
upgrade to Oracle Database 10g.

If your parameter file is a text-based initialization parameter file with 
either an IFILE (include file) or a SPFILE (server parameter file) entry, 
and the file specified in the IFILE or SPFILE entry resides within the old 
environment's ORACLE_HOME, then copy the file specified by the IFILE or 
SPFILE entry to the new ORACLE_HOME. The file specified in the IFILE or SPFILE
entry contains additional initialization parameters.

If you have a password file that resides within the old environments 
ORACLE_HOME, then move or copy the password file to the new Oracle Database
10g ORACLE_HOME.

The name and location of the password file are operating system-specific. 
On UNIX platforms, the default password file is ORACLE_HOME/dbs/orapwsid. 
Step 16:

Update the oratab entry, to set the new ORACLE_HOME and disable automatic startup:

SID:ORACLE_HOME:N

Step 17:

Update the environment variables like ORACLE_HOME and PATH 

$. oraenv

Step 18:

Make sure the following environment variables point to the new release (10g) directories: 
- ORACLE_HOME 
- PATH 
- ORA_NLS10
- ORACLE_BASE 
- LD_LIBRARY_PATH 
- LD_LIBRARY_PATH_64 (Solaris only)
- LIBPATH (AIX only)
- SHLIB_PATH (HPUX only)
- ORACLE_PATH 

$ env | grep ORACLE_HOME 
$ env | grep PATH 
$ env | grep ORA_NLS10
$ env | grep ORACLE_BASE 
$ env | grep LD_LIBRARY_PATH 
$ env | grep ORACLE_PATH


Step 19:

Startup upgrade the database:

$ cd $ORACLE_HOME/rdbms/admin 
$ sqlplus / as sysdba 
Use Startup with the UPGRADE option:
SQL> startup upgrade

Step 20:

Create a SYSAUX tablespace. In Oracle Database 10g, the SYSAUX tablespace is used to consolidate data from a number of tablespaces that were separate in previous releases.

The SYSAUX tablespace must be created with the following mandatory attributes:

- ONLINE
- PERMANENT
- READ WRITE
- EXTENT MANAGEMENT LOCAL
- SEGMENT SPACE MANAGEMENT AUTO

The Upgrade Information Tool(utlu102i.sql in step 4) provides an estimate of the minimum required size for the SYSAUX tablespace in the SYSAUX Tablespace section.

The following SQL statement would create a 500 MB SYSAUX tablespace for the database:

SQL> CREATE TABLESPACE sysaux DATAFILE 'path/sysaux01.dbf'
SIZE 500M REUSE
EXTENT MANAGEMENT LOCAL
SEGMENT SPACE MANAGEMENT AUTO
ONLINE;

Step 21:
Run the catupgrd.sql script, spooling the output so you can check whether any errors occured and investigate them

SQL> spool upgrade.log
SQL> @catupgrd.sql

The catupgrd.sql script determines which upgrade scripts need to be run and then runs 
each necessary script. You must run the script in the new release 10.2 environment.

The upgrade script creates and alters certain data dictionary tables. It also upgrades 
or installs the following database components in the new release 10.2 database:

spool off
Then, check the spool file and verify that the packages and procedures compiled successfully. You named the spool file earlier in this step; the suggested name was upgrade.log. Correct any problems you find in this file and rerun the appropriate upgrade script if necessary. You can rerun any of the scripts described in this note as many times as necessary.

Step 22:

Run utlu102s.sql, specifying the TEXT option:

SQL> @utlu102s.sql TEXT

This is the Post-upgrade Status Tool displays the status of the database components in the upgraded database.

Step 23: 

Restart the database:
SQL> shutdown immediate (DO NOT use "shutdown abort" !!!) 
SQL> startup restrict

Step 24: 

Run utlrp.sql to recompile any remaining stored PL/SQL and Java code.

SQL> @utlrp.sql 

Verify that all expected packages and classes are valid:

If there are still objects which are not valid after running the script run the following: 
spool invalid_post.lst 
Select substr(owner,1,12) owner, 
substr(object_name,1,30) object, 
substr(object_type,1,30) type, status 
from 
dba_objects where status <>'VALID'; 
spool off 

Now compare the invalid objects in the file 'invalid_post.lst' with the invalid objects in the file 'invalid_pre.lst' you create in step 4.

After Upgrading a Database

Step 25:

Modify the listener.ora file: 
For the upgraded instance(s) modify the ORACLE_HOME parameter to point to the new ORACLE_HOME

Step 26:

Start the listener 
$ lsnrctl 
LSNRCTL> start 

Step 27:

Enable cron and batch jobs 

Step 28:

Change oratab entry to use automatic startup 
SID:ORACLE_HOME:Y