Have you ever seen a message “ORA-00060: Deadlock detected” and
automatically assumed that it was an application coding issue? Well, it
may not be. There are DBA-related issues and you may be surprised to
find out that INSERTs may cause deadlock. Learn all the conditions that
precipitate this error, how to read the "deadlock graph" to determine
the cause, and most important: how to avoid it.
Introduction
I often get a lot of questions in some form or the other like the following:
- What's a Deadlock
- How can I prevent it
- Why would an INSERT cause deadlock
- Why would I need to index FK columns
- Is ON DELETE CASCADE FK constraint a good idea?
Deadlock is one of those little understood and often misinterpreted
concepts in the Oracle Database. The word rhymes with locking, so most
people assume that it is some form of row locking. Broadly speaking,
it’s accurate; but not entirely. There could be causes other than row
level locking. This is also often confused by people new to Oracle
technology since the term deadlock may have a different meaning in other
databases. To add to the confusion, Oracle’s standard response to the
problem is that it’s an application design issue and therefore should be
solved through application redesign. Well, in a majority of cases
application design is a problem; but not in all cases. In this post, I
will describe:
- Why Deadlocks Occur
- Primer on Oracle Latching, Locking
- How to Interpret Deadlock Traces
- Various Cases of Deadlocks
- Some Unusual Cases from My Experience
Deadlocks Explained
With two Oracle sessions each locking the resource requested by the
other, there will never be a resolution because both will be hanging
denying them the opportunity to commit ot rollback and therefore
releasing the lock. Oracle automatically detects this deadly embrace and
breaks it by forcing one statement to roll back abruptly (and releasing
the lock) and letting the other transaction to continue.
Here is how a deadlock occurs. Two sessions are involved, doing updates on different rows, as shown below:
Step Session 1           Session 2
---- ------------------- -----------------
1.   Update Row1
     (Does not Commit)
2.                       Update Row2
                        (Does not Commit)
3.   Update Row2
4.   Waits on TX Enqueue
5.                       Update Row1
At the step 5 above since Row1 is locked by session1, session2 will
wait; but this wait will be forever, since session1 is also waiting and
can’t perform a commit or rollback until that wait is over. But session
1's wait will continue to exist until session 2 commits or rollback - a
Catch 22 situation. This situation is a cause of deadlock and Oracle
triggers the ststement at Step 3 to be rolled back (since it detected
that deadlock). Note that only the statement that detected the deadlock
is rolled; the previous statements stay. For instance, update row1 in
Step 1 stays.
This is the most common cause of deadlocks and is purely driven by
application design and can only be solved by reducing the possibility of
occurence of that scenario. Now that you understand how a deadlock
occurs, we will explore some other causes of deadlocks. But before that,
we will explore different types of locks in Oracle.
Types of Locks
Database locks are queue-based, i.e. the session first waiting for the
lock will get it first, before another session which started waiting for
the same resource after the first session. The requesters are placed in
a queue, hence locks are also called
Enqueues. There are several types of enqueues; but we will focus on row locking, and specifically only two type of them:
- TM – this is related to database structural changes. Suppose
someone is executing some query against a table, such as SELECTing from
it. The table structure should remain the same in that period. TM locks
protect the table structure so that someone does not add a column during
that query. TM locks allow multiple queries and DMLs, but not DDL
against the table.
- TX – this is the row level locking. When a row is locked by a session, this type of lock is acquired.
Anatomy of a Deadlock Trace
When a deadlock occurs and one of the statements gets rolled back,
Oracle records the incident in the alert log. Here is an example entry:
 ORA-00060: Deadlock detected. More info in file
/opt/oracle/diag/rdbms/odba112/ODBA112/trace/ODBA112_ora_18301.trc.
Along with the alert log entry, the incident creates a tracefile (as
shown above). The trace file shows valuable information on the deadlock
and should be your first stop in diagnosis. Let's see the various
sections of the tracefile:
Deadlock Graph
The first section is important; it shows the deadlock graph. Here are
the various pieces of information on the graph. Deadlock graph tells you
which sessions are involved, what types of locks are being sought
after, etc. Let's examine the deadlock graph, shown in the figure below:

Row Information
The next critical section shows the information on the rows locked
during the activities of the two sessions. From the tracefile you can
see the object ID. Using that, you can get the object owner and the name
from the DBA_OBJECTS view. The information in on rowID is also
available here. You can get primary key information from the object
using that rowID.

Process Information
The tracefile also shows the Oracle process information which displays
the calling user. That information is critical since the schema owner
may
not be the one that issued the statement.

With the information collected from various sections of the deadlock graph, you now know the following:
- The session that caused it
- The session that was the victim
- The Oracle SID and process ID of the sessions
- The object (the table, materialized view, etc.) whose row was in the deadlock
- The exact row that was so popular to cause the deadlock.
- The SQL statement that caused the deadlock.
- The machine the session came from with the module, program (e.g. SQL*Plus) and userid information
Now it is a cinch to know the cause of that deadlock and which specific part of the application you need to address to fix it.
Other Causes
The case described above is just one type of locking scenario causing
deadlocks; but this is not the only one. Other types of locks also cause
deadlocks. These scenarios are usually difficult to identify and
diagnose and are often misinterpreted. Well, not for
you.You will learn how to diagnose these other causes in this post. These causes include:
- ITL Waits
- Bitmap Index Update
- Direct Path Load
- Overlapping PK Values
Deadlocks due to ITL Shortage
You can read how ITL works in another of my blogposts -
How Oracle Locking Works.
In summary, when a session locks a row, it does not go to a central
lock repository and get a lock from there. Instead, the session puts the
information on the lock in the header of the block, called Interested
Transaction List (ITL). Each ITLslot takes up 24 bytes. Figure 1 below
shows an empty block with just one ITL slot. When rows are inserted,
from bottom of the block upwards, the free space gradually drops.

When a session - session1 - wants to lock the row1, it uses the slot#1
of the ITL, as shown in Figure 3 below. Later, another session –
session2 – updates row2. Since there is no more ITL slot, Oracle creates
a new slot – slot#2 – for this transaction. However, at this stage, the
block is almost packed. If a third transaction comes in, there will be
no more room for a third ITL slot to be created; causing the session to
wait on ITL. Remember, this new session wants to lock
row3, which
is not locked by anyone and could have been locked by the session; but
it’s artificially prevented from being locked due to the absence of an
ITL slot.

Checking for ITL Shortage
You can check for ITL shortage by issuing this query:
select owner, object_name, value
from v$segment_statistics
where statistic_name = 'ITL waits'
and value > 0
Here is a sample output:
OWNER       OBJECT_NAME                    VALUE
----------- ------------------------- ----------
SYSMAN      MGMT_METRICS_1HOUR_PK             19
ARUP        DLT2                              23
ARUP        DLT1                             131
If you check the EVENT column of V$SESSION to see which sessions are
experiencing it right now, you will see that the sessions are waiting
with the event:
enq: TX - allocate ITL entry.
Deadlock Scenario
Here is the scenario where two sessions cause a deadlock due to ITL shortage. Imagine two rows – row1 and row2 – are in the
same block. The block is so tightly packed that only two ITL slots can be created.
| Step | Session1 | Session2 |
| 1 | Update Table1 Row1
(1 ITL slot is used; no more free ITL slots and no room in the block to create one) |
|
| 2 |
| Update Table2 Row1
(One ITL slot is gone. There are no more free ITL slots and no room to create one) |
| 3 | Update Table2 Row2
(Lack of ITL slots; so this will hang) |
|
| 4 |
| Update Table1 Row2
(Lack of ITL slots will make this hang as well. Deadlock!) |
At Step 4 Session 2's hang can't be resolved until session 1 releases
the lock, which is not possible since it itself is hanging. This never
ending situation is handled by Oracle by detecting it as a deadlock and
killing one of the sessions.
Deadlock Graph
To identify this scenario as the cause of deadlock, look at the deadlock
graph. This is how a deadlock graph looks like when caused by ITL
waits.
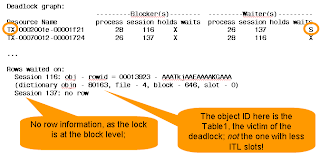
The absence of row information on one of the sessions is a dead giveaway
that this is a block level issue; not related to specific rows. Here
are the clues in this deadlock graph:
- The lock type is TX (row lock) for both the sessions
- The holders held the lock in "X" (exclusive) mode (this is expected for TX locks)
- However, only one of the waiters is waiting in the "X" mode. The
other is waiting with the "S" (shared) mode, indicating that it's not
really a row lock the session is waiting for.
- One session has the row information; the other doesn't.
These clues give you the confirmation that this is an ITL related
deadlock; not because of the application design. Further down the
tracefile we see:

As you can see, it’s not 100% clear from the tracefile that the deadlock
was caused by ITL. However by examining the tracefile we see that the
locks are of TX type and the wait is in the “S” (shared) mode. This
usually indicates ITL wait deadlock. You can confirm that is the case by
checking the ITL shortages on that segment from the view
V$SEGMENT_STATISTICS as shown earlier.
Update on 4/19/2013: [Thanks, Jonathan Lewis]
Occasionally you may see two rows here as well, as a result of a
previous wait (e.g. buffer busy wait) on the block which has not been
cleaned out yet. In such a case you will see information on two rows;
but there are some other clues that may point to this cause. The row
portion of the rowid will be 0, meaning it was not a row but the block.
The other clue might be that the row information points to a row that
has nothing to do with the SQL statement. For instance, you may find the
row information pointing to a row in table Table1 whereas the SQL
statement is "update Table2 set col2 = 'X' where col1 = 2".
The solution is very simple. Just increase the INITRANS value of the
table. INITRANS determines the initial number of ITL slots. Please note,
this value will affect only the new blocks; the old ones will still be
left with the old values. To affect the old ones you can issue
ALTER TABLE TableName MOVE to move the tables to nw blocks and hence new structure.
Deadlock due to Foreign Key
This is a really tricky one; but not impossible to identify. When a key
value in parent table is updatd or a row is deleted, Oracle attempts to
takes TM lock on the entire child table. If an index is present on the
foreign key column, then Oracle locates the corresponding child rows and
locks only those rows. The documentation in some versions may not very
clear on this. There is a documentation bug (MOS Bug# 2546492). In the
absense of the index, a whole table TM lock may cause a deadlock. Let's
see the scenario when it happens.
Scenario
Here is the scenario when this deadlock occurs.
Step
| Session1
| Session2
|
| 1 | Delete Chaild Row1 |
|
| 2 |
| Delete Child Row2 |
| 3 | Delete Parent Row1
(Waits on TM Enqueue) |
|
| 4 |
| Delete Parent Row2
(Waits on TM Enqueue)
Deadlock! |
Deadlock Graph
This is how the deadlock graph looks like when caused by unindexed
foreign key. As you can see, the deadlock graph does not clearly say
that the issue was to do with Foreign Key columns not being
indexed.Instead, the clues here are:
- TM locks for both the sessions, instead of TX. Remember: TM are
metadata related, as opposed to TX, which is a row related lock.
- The lock type of holders is Share Exclusive (SX) as opposed to Exclusive (X)
- Sessions do not show any row information
These three clues together show that this deadlock is due to FK contention rather than the conventional row locks.
So, what do you do? Simple - create the indexes on those FKs and you
will not see this again. As a general rule you should have indexes on
FKs anyway; but there are exceptions, e.g. a table whose parent key is
never updated or deleted infrequently (think a table with country codes,
state codes or something pervasive like that). If you see a lot of
deadlocks in those cases, perhaps you should create indexes on those
tables anyway.

Deadlock due to Direct Load
Direct Load is the fastest way to load data into a table from another
source such as a table or a text file. It can be effected in two ways –
the APPEND hint in INSERT statement (
insert /*+ append */ )
or by using DIRECT=Y option in SQL*Loader. When a table is loaded with
Direct Path, the entire table is locked from further DMLs, until
committed. This lock may cause deadlocks, when two sessions try to load
into the same table, as shown by the scenario below.
Scenario
| Step | Session1 | Session2 |
| 1 | Direct Path Load into Table1 |
|
| 2 |
| Direct Path Load into Table2 |
| 3 | Direct Path Load into Table2
(Hangs with TM Enqueue; since Session2 has the lock) |
|
| 4 |
| Direct Load into Table1
TM lock on Table1 prevents this operation
Deadlock! |
Deadlock Graph
As usual, the deadlock graph confirms this condition. Here is how the deadlock graph looks like:

Both sessions do not show any row information; and subsequent parts of
the tracefile do not show any other relevant information. The key to
identify this deadlock as caused by Direct Path is to look for the type
of lock mode – X. This type of lock mode exists for row level locking as
well. However the deadlock graph shows row information in that case.
So, the clues for this type of deadlock are:
- Lock type is TM (as shown in the Resource Name)
- Lock mode for both the holders and waiters is X (indicating a row lock)
- No row information (since it is not really row-related)
Deadlock due to Bitmap Index Contention
Bitmap Index is a special type of index that stores bitmaps of actual
values and compare bitmaps to bitmaps, e.g. instead of comparing
literals such as "A" = "A", Oracle converts the value to a bitmap and
compares against the stored bitmap values. For instance “A” might be
represented as "01011"; so the comparison will be “01011” = "01011".
Index searches are way faster compared to literal comparison.
However, there is a price to pay for this performance. Unlike a regular
b*tree index, when a row is updated, the index piece of the bitmap index
is locked until the transaction is committed. Therefore udates to any
of the rows covered by that index piece hangs. When two sessions update
two different rows covered by the same index piece, they wait for each
other. Here is the scenario when this condition arises.
Scenario
Step
| Session1
| Session2
|
| 1 | Update Row 1
(Bitmap index piece is locked) |
|
| 2 |
| Update Row2
(Hangs for TX Row Lock) |
| 3 | Update Row2
(Hangs as bitmap index piece is locked by session2 and can't release until it commits)
Deadlock! |
|
Deadlock Graph
You can confirm this occurrence from readling the deadlock graph.

The clues that show this type of deadlock:
- The lock type is TX (as shown in the Resource Name)
- The lock wait mode is “S” (shared) but the type of lock is TX rather than TM.
- The waiter waits with mode "S" instead of "X"
- The row information is available but the object ID is not the ID of the table; but the bitmap index.
The solution to this deadlock is really simple – just alter the
application logic in such a way that the two updates will not happen in
sequence without commits in between. If that’s not possible, then you
have to re-evaluate the need for a bitmap index. Bitmap indexes are
usually for datawarehouse only; not for OLTP.
Deadlock due to Primary Key Overlap
This is a very special case of deadlock, which occurs during inserts;
not updates or deletes. This is probably the only case where inserts
cause deadlocks. When you insert a record into a table but not commit
it, the record goes in but a further insert with the same primary key
value waits. This lock is required for Oracle because the first insert
may be rolled back, allowing the second one to pass through. If the
first insert is committed, then the second insert fails with a PK
violation. But in the meantime-before the commit or rollback is
issued-the transaction causes the second insert to wait and that causes
deadlock. Let's examine the scenario:
Scenario
Step
| Session1
| Session2
|
| 1 | Insert PK Col value = 1
(Doesn't commit) |
|
| 2 |
| Insert PK Col value = 2
(Doesn't commit) |
| 3 | Insert PK Col = 2
(Hangs, until Session2 commits) |
|
| 4 |
| Insert PK Col = 1
(Hangs and Deadlock) |
Deadlock Graph
The deadlock graph looks like the following.

The key clues are:
- The lock type is TX (row lock)
- The holders are holding the lock in "X" (exclusive) mode
- The waiters are waiting for locks in “S” mode, even when the locks type TX.
- The subsequent parts of the tracefile don’t show any row information.
However, the latter parts of the tracefile shows the SQL statement,
which should be able to point to the cause of the deadlock as the
primary key deadlock. Remember, this may be difficult to diagnose first
since there is no row information. But this is probably normal since the
row is not formed yet (it's INSERT, remember?).
Special Cases
I have encountered some very interesting cases of deadlocks which may be
rather difficult to diagnose. Here are some of these special cases.
Autonomous Transactions
Autonomous transactions are ones that are kicked off form inside another
transaction. The autonomous one follows its own commit, i.e. it can
commit independently of the outer transaction. The autonomous
transaction may lock some records the parent transaction might be
interested in and vice versa – a perfect condition for deadlocks. Since
the autonomous transactions is triggered by its parent, the deadlocks
are usually difficult to catch.
Here is how the deadlock graph looks like (exceprted from the tracefile)
---------Blocker(s)-------- ---------Waiter(s)---------
Resource Name process session holds waits process session holds waits
TX-0005002d-00001a40 17 14 X 17 14 X
session 14: DID 0001-0011-00000077
session 14: DID 0001-0011-00000077
Rows waited on:
Session 14: obj - rowid = 000078D5 - AAAHjVAAHAAAACOAAA
(dictionary objn - 30933, file - 7, block - 142, slot - 0)
Information on the OTHER waiting sessions:
End of information on OTHER waiting sessions.
Here are the interesting things about this deadlock graph, which are clues to identifying this type of deadlock:
- The lock type is TX (row lock) and the mode is "X", which is exclusive. This indicates a simple row lock.
- Remember, deadlocks are always as a result of two transactions; not
one. However, the deadlock graph shows only one session. The other
session information is not even there.The
presence of only one session indicates that the other transaction
originated from the same session - hence only one session was recorded.
The only way two transactions could have originated from the same
session is when the transaction is an autonomous one.
- The row information is not there because the autonomous transaction acts independently of the parent.
If you see a deadlock graph like this, you can be pretty much assured that autonomous transactions are to blame.
Update on 4/19/2013. [Thanks,
Mohamed Houri] The above cause is not limited to TX locks; it could happen in TM locks as well. The diagnosis remains the same.
Deadlocks among the PQ slaves
Consider a procedural logic like this:
LOOP
SELECT /*+ PARALLEL */ … FOR UPDATE
END LOOP
This code locks the rows selected by the parallel query slaves. Since
the select is done in parallel, the PQ slaves distribute the rows to be
selected. Therefore the locking is also distributed among the PQ slaves.
Since no two rows are updated by the same PQ slave (and hence the same
session), there is no cause for deadlocks.
However, assume the code is kicked off more than once concurrently. This
kicks off several PQ slaves and many query coordinators. In this case
there is no guarantee that two slaves (from different coordinators) will
not pick up the same row. In that case, you may run into deadlocks.
Triggers firing Autonomous Transactions
If you have triggers firing Autonomous Transactions, they may cause
deadlocks, in the same line described in the section on autonomous
transactions.
Freelists
In case of tablespaces defined with manual segment space management, if
too many process freelists are defined, it's possible to run out of
transaction freelists, causing deadlocks.
In Conclusion
The most common cause of deadlocks is the normal row level locking,
which is relatively easy to find. But that's not the only reason. ITL
Shortage, Bitmap Index Locking, Lack of FK Index, Direct Path Load, PK
Overlap are also some of the potential causes. You must check the
tracefile and interpret the deadlock graph to come to a definite
conclusion on the cause of the deadlock. Some of the causes, e.g. ITL
shortage, are to do with the schema design; not application design and
are quite easy to solve. Some causes, as in the case of the PK overlap
case, INSERTs cause deadlocks.


